

Vitavia Uranus 9900 Handleiding
PDF handleiding · 32 Pagina's
Nederlands



Snelle check
Onjuist antwoord, probeer opnieuw.
Chat met je Vitavia Uranus 9900-handleiding via AI
Krijg direct AI-antwoorden uit je Vitavia Uranus 9900-handleiding
Vraag alles over Vitavia Uranus 9900. Antwoorden komen uit deze handleiding, met de pagina's waarop ze zijn gebaseerd.
Uranus 9900 Onderhoudsschema
Grondig wassen met een zachte reiniger. Zorg ervoor dat de reiniger niet agressief reageert met aluminium of glasbevestigingsclips.
Reinig regelmatig de bovenste en onderste deursporen om ophoping van vuil te voorkomen.
Stel eenVraag
Beveel je Uranus 9900 aan?
Ja NeeVeelgestelde Vragen
Hij is ontworpen voor het kweken van planten in een beschermde, lichte en geventileerde ruimte. De indeling is geschikt voor zaaien, oppotten en reguliere teelt gedurende wisselende seizoenen.
Is dit antwoord nuttig?
Ja. De instructies raden twee personen aan voor de montage. Dat maakt het eenvoudiger om panelen te hanteren, het frame uit te lijnen en de beglazing veilig en nauwkeurig te plaatsen.
Is dit antwoord nuttig?
De basis moet perfect haaks en waterpas zijn. Een stalen basis wordt genoemd als accessoire, en een stenen of betonnen fundering kan ook worden gebruikt als deze volgens de juiste afmetingen is gebouwd.
Is dit antwoord nuttig?
Ja. De handleiding bevat richtlijnen voor 4 mm beglazing en dikker. Deze is bedoeld om een praktische balans te bieden tussen lichtinval en bescherming voor plantengroei.
Is dit antwoord nuttig?
Draai ze niet te strak aan. De handleiding specificeert een maximaal koppel van 3 Nm, wat helpt het frame en de bevestigingen te beschermen tegen spanning of schade.
Is dit antwoord nuttig?
Sluit alle deuren en ventilatieopeningen bij harde wind. Bij zware sneeuwval moet je het dak sneeuwvrij maken of het goed ondersteunen om de belasting op de constructie te verminderen.
Is dit antwoord nuttig?
Voordelen en Nadelen
Voordelen

- Ruim ontwerp dat een breed scala aan planten en tuinprojecten ondersteunt.
- 4mm beglazing en dakventilatie helpen licht, luchtstroom en temperatuur in balans te houden.
- Dubbele deuren maken het makkelijker om gereedschap, trays en grotere planten in en uit te brengen.
- Gedetailleerde handleiding helpt bij een haakse, stabiele en duurzame montage.
Nadelen

- Montage is arbeidsintensief en vereist zorgvuldige organisatie plus twee personen.
- De basis moet waterpas en haaks zijn, waardoor de voorbereiding van de locatie tijd kost.
- Bouten mogen niet te strak worden aangedraaid, wat precisie toevoegt aan het montageproces.
- Het hanteren van glas en beglazingsclips vereist voorzichtigheid en beschermende uitrusting.
Product Specificatie
Beglazing
Polycarbonaat 4mm (Kanaalplaten)
Frame
Aluminium
Kleur
zwart
Oppervlakte
9,9m²
Bijzonderheden
Dakraam, Regengoot
Deur
Dubbele schuifdeur
Afmetingen (LxBxH)
3.830x2.570x2.480mm
Gewicht
72,20kg
Product Beschrijving
Vitavia Uranus 9900 HKP 4mm Kas Zwart
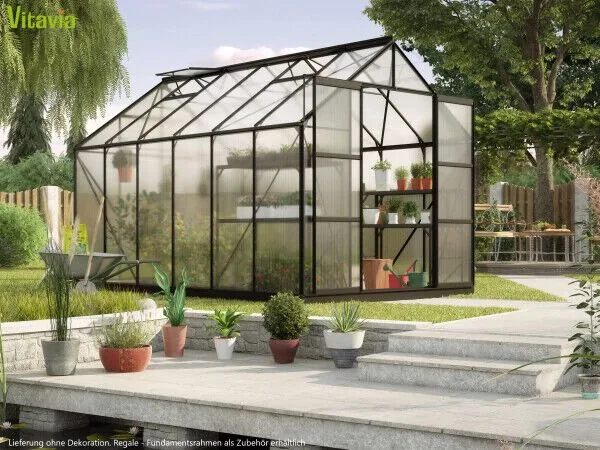
De Vitavia Uranus 9900 HKP 4mm kas zwart handleiding verwijst naar een kas die is gebouwd voor tuiniers die een ruime, betrouwbare en netjes afgewerkte groeiruimte willen. Met zijn elegante zwarte uitstraling en praktische indeling is dit model ontworpen om alles te ondersteunen, van het vroeg opkweken van zaden tot teelt in een langer seizoen, terwijl planten beschermd en eenvoudig te beheren blijven.
Een kas gemaakt voor gelijkmatige groei
Wat het meest opvalt, is de balans tussen structuur en gebruiksgemak. De handleiding benadrukt een sterk aluminium frame, zorgvuldige verankering en nauwkeurige montage, die allemaal helpen om een stabiele thuisbasis voor planten te creëren. De 4mm beglazingsoptie is ideaal voor dagelijks gebruik van de kas en biedt lichtdoorlatendheid die gezonde groei ondersteunt, terwijl de ruimte toch stevig en beschermd blijft. Dubbele deuren maken de toegang eenvoudiger, of je nu trays, gieters of hogere potplanten draagt.
Gebouwd met praktische details in gedachten
De instructies laten ook zien hoeveel aandacht er is besteed aan de dagelijkse functie. Dakventilatie is inbegrepen om warmte en vochtigheid te helpen beheersen, wat essentieel is bij wisselend weer. Het deursysteem is ontworpen om soepel te schuiven wanneer het correct is gemonteerd, en de dakruit kan voor een betere luchtstroom worden gepositioneerd. Deze kleine details maken een groot verschil zodra de kas in regelmatig gebruik is.
Montage en opstelling zijn belangrijk
De handleiding benadrukt duidelijk de voorbereiding: kies een zonnige, beschutte plek, controleer elk onderdeel voordat je begint, houd bundels georganiseerd en bouw op een haakse, waterpas fundering. Dat advies is meer dan technische aanwijzing — het is de sleutel tot een kas die op lange termijn goed presteert. De constructie moet zorgvuldig door twee personen worden gemonteerd, waarbij bouten alleen tot het aanbevolen koppel worden aangedraaid. Dit helpt het frame, de panelen en de bevestigingen tijdens de installatie te beschermen.
Een slimme keuze voor toegewijde tuiniers
Deze kas draait niet alleen om uitstraling; het gaat om het creëren van een betrouwbare groeiruimte. De combinatie van een verfijnde zwarte afwerking, praktische ventilatie en aanpasbare beglazing maakt het een sterke optie voor tuiniers die zowel stijl als functionaliteit willen. Ook het onderhoud is eenvoudig: regelmatig schoonmaken, duidelijke deurgeleiders en aandacht voor weersomstandigheden helpen de kas jarenlang in goede staat te houden.
Opmerkingen
- Veranker de kas altijd stevig.
- Sluit deuren en ventilatieopeningen bij harde wind.
- Verwijder sneeuw van het dak in de winter.
- Bewaar de handleiding voor toekomstig gebruik en reserveonderdelen.
Zoek naar 67.706 Handleidingen online


Typ merk of model in