

Vitavia Meridian 2 6700 Handleiding
PDF handleiding · 36 Pagina's
Nederlands



Snelle check
Onjuist antwoord, probeer opnieuw.
Chat met je Vitavia Meridian 2 6700-handleiding via AI
Krijg direct AI-antwoorden uit je Vitavia Meridian 2 6700-handleiding
Vraag alles over Vitavia Meridian 2 6700. Antwoorden komen uit deze handleiding, met de pagina's waarop ze zijn gebaseerd.
Meridian 2 6700 Onderhoudsschema
Grondig wassen met een mild schoonmaakmiddel. Zorg ervoor dat het schoonmaakmiddel niet agressief reageert met aluminium of bevestigingsklemmen voor glas.
Zorg ervoor dat de bovenste en onderste deurtracks regelmatig worden gereinigd om ophoping van vuil te voorkomen.
Stel eenVraag
Beveel je Meridian 2 6700 aan?
Ja NeeVeelgestelde Vragen
U hebt schroevendraaiers (plat en kruiskop PH2), een 10 mm ringsleutel of sleutel, een combinatie-sleutel, een mes, een meetlat, een waterpas en een accuboor met instelbaar koppel nodig.
Is dit antwoord nuttig?
Ja, maar u moet de specifieke instructieblad volgen dat bij de polycarbonaatplaten is inbegrepen in plaats van de standaard gids voor glasbeglazing.
Is dit antwoord nuttig?
Ja, de kas moet altijd op de grond worden verankerd om stabiliteit te garanderen, vooral bij windachtige omstandigheden.
Is dit antwoord nuttig?
Het maximale aandraaimoment voor de moeren is 3Nm. Te hard aantrekken kan de aluminium profielen of draden beschadigen.
Is dit antwoord nuttig?
Reinig de bovenste en onderste deurrails regelmatig om ophoping van puin te voorkomen, zodat de deur vrij en zonder obstructie kan glijden.
Is dit antwoord nuttig?
Als er onderdelen ontbreken na het uitpakken, neem dan onmiddellijk contact op met uw handelaar voor vervanging voordat u begint met montage.
Is dit antwoord nuttig?
Voordelen en Nadelen
Voordelen

- Duurzaam aluminium frame bestand tegen roest en corrosie
- 4mm beglazing biedt uitstekende thermische isolatie voor planten
- Soepel schuifdeursysteem maakt eenvoudige toegang tot het interieur mogelijk
- Modulair ontwerp beschikbaar in meerdere maten om verschillende tuinlay-outs te passen
- Uitgebreide montagewijzingen inbegrepen in meerdere talen
Nadelen

- Vereist een perfect vlak en vierkant fundament voor juiste uitlijning
- Siliconen verzegelmateriaal is niet inbegrepen in het standaard pakket
- Zware sneeuwbelasting vereist handmatige verwijdering om structurele stress te voorkomen
- Montage moet worden uitgevoerd door ten minste twee personen voor veiligheid
- Glazen panelen vereisen zorgvuldige behandeling en specifieke veiligheidsmaatregelen
Product Specificatie
Beglazing
Policarbonaat 4mm (holle kamerpanelen)
Frame
Aluminium
Kleur
Zilver
Oppervlak
6,68 m2
Kenmerken
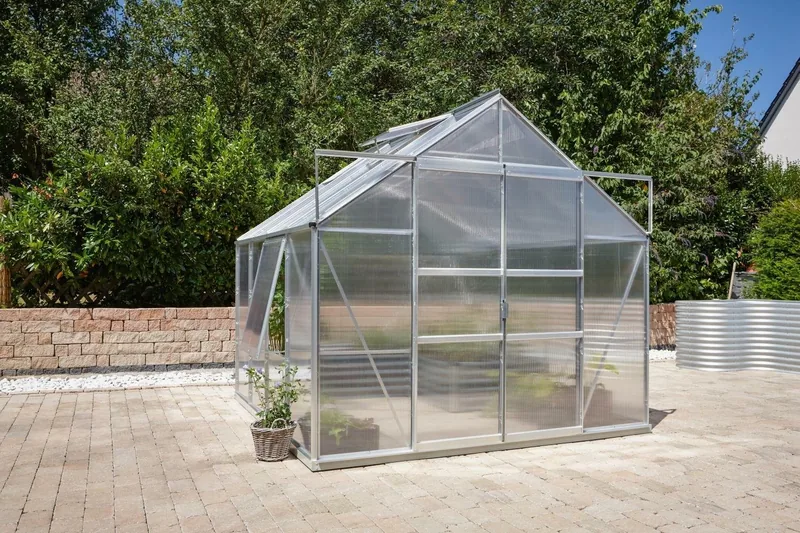
2 dakkapellen, 1 scharnierend raam, goot, afsluitbaar
Deur
Dubbele schuifdeur
Afmetingen (LxBxH)
8465x8432x7612 mm
Product Beschrijving
Ontdek de Vitavia Meridian 2 6700 HKP 4mm kas alu
Het creëren van een heiligdom voor uw planten is nooit zo eenvoudig geweest met de Vitavia Meridian 2 6700 HKP 4mm kas alu. Deze robuuste constructie is ontworpen om de perfecte omgeving te bieden voor tuinliefhebbers die duurzaamheid en stijl eisen. De kas beschikt over een strak aluminium frame dat zorgt voor levensduur en weerstand tegen corrosie door de elementen. Met 4mm dik glas biedt dit model uitstekende isolatie-eigenschappen, waardoor uw planten warm blijven tijdens koelere nachten en ze worden beschermd tegen harde wind.
De montage van de Vitavia Meridian 2 is rechtstreeks als u de gedetailleerde handleiding volgt. De kit bevat alle benodigde onderdelen voor maten 6700, 8300, 9900 en 11500, zodat u de voetafdruk kunt aanpassen aan uw tuinspace. Het ontwerp bevat schuifdeuren die soepel glijden op speciale rails, waardoor toegang tot uw planten moeiteloos is, zelfs in krappe ruimtes. Veiligheid heeft prioriteit, dus de instructies benadrukken het dragen van beschermingsmiddelen tijdens montage en het zorgvuldig hanteren van glas of polycarbonaatplaten.
Onderhoud van uw nieuwe kas is minimaal maar effectief. Regelmatig schoonmaken met een milde detergent houdt het aluminium frame en de glazen panelen er pristine uit zonder de materialen te beschadigen. Het is cruciaal om de deurrails vrij te houden van puin om ervoor te zorgen dat het schuifmechanisme wrijvingsloos blijft. Voor mensen die in gebieden met zware sneeuwval wonen, ondersteunt de stevige constructie daklasten, hoewel het verwijderen van sneeuw periodiek wordt aanbevolen om stress op de constructie te voorkomen.
De Vitavia Meridian 2 6700 HKP 4mm kas alu is meer dan alleen een onderkomen; het is een hulpmiddel voor het kweken. Of u nu exotische bloemen kweekt of zaailingen start voor de oogst in de lente, deze kas biedt de stabiliteit en klimaatcontrole die nodig zijn voor succes. Vergeet niet de unit veilig op de grond te verankeren om sterke windstoten te weerstaan. Door de richtlijnen voor locatiewaardering te volgen en een zonnige, beschutte locatie te kiezen, maximaliseert u het potentieel van uw binnentuin.
Belangrijke Opmerkingen
- Controleer altijd de onderdelenlijst voordat u begint met montage om zeker te weten dat niets ontbreekt.
- Draai bouten niet te vast; een maximaal koppel van 3Nm wordt aanbevolen om beschadiging van draden te voorkomen.
- Zegel randen met neutraal siliconen als u een volledig weerdicht zegel wenst, hoewel dit optioneel is.
- Bewaar de handleiding veilig voor toekomstige referentie betreffende vervangingsonderdelen.
Zoek naar 67.706 Handleidingen online


Typ merk of model in